Wednesday, August 24, 2016

72 Hours In Hong Kong

Where do I begin?! First off Hong Kong is an amazing city. AH-MAZING! Since I have been to Shanghai and Osaka before I was used to the culture difference in Asia but what I loved about Hong Kong was the simplicity of getting around, the available english everywhere, and being in a vibrant, moving city.

We spent a short amount of time in Hong Kong so here is a round up of what we did in 72 hours...

Things To Do

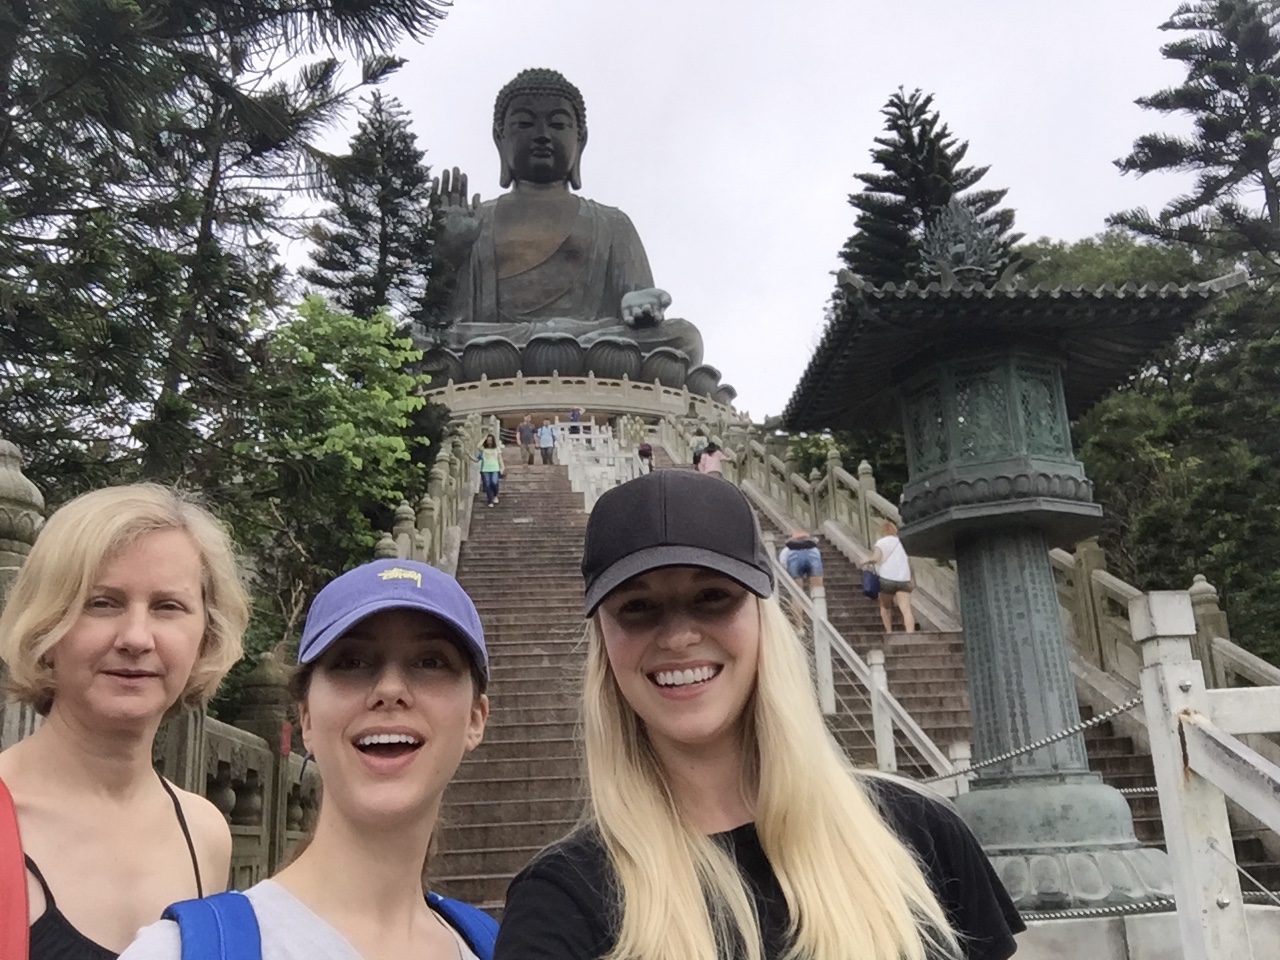
The must check out attractions are The Peak (given) with amazing views, you need to do this but make sure to get up early and go in the morning. We also checked out Victoria Harbour which our hotel was super close to, and they have a light show every day at 8pm. As well as the Ladies Market, Tian Tan Buddha (very peaceful) and Repulse Bay. We spent one day wandering around Soho, which I loved the street graffiti as well as the cute one of a kind boutiques makes it worth while.
With limited time we couldn't fit it all in so my advice would be to skip Repulse Bay and definitely hit up Tian Tan Buddha, Soho, The Peak, and Victoria Harbour.

Things To Eat
You can't go to Hong Kong and not check out their food scene, it is unreal! Basically I have a very big sweet tooth so my good to is always sugar which you can see above, lol! We loved Oddies Foodies (went their multiple times) for their artisan gelato and yummy egg waffles. Our favourite dinner was Yum Cha, with their cute animal dumplings and amazing chinese food we did not stop eating. I would recommend making resos before you go because it gets busy. Another restaurant that we absolutely loved was YardBird. Seriously GO! I didn't take any photos but the food was unreal and we had a really great time and amazing staff. Last but not least for breakfast we were craving healthy so we went to Elephant Grounds with their avocado and egg toast, very yummy!

What were your go-to attractions in HK?!
xx


SHARE:

Friday, July 8, 2016

The Girly Girl's Guide to Packing for Southeast Asia

When my friend came to me and asked me if I wanted to go to Asia my automatic response was YES! I had already travelled and lived in Osaka for three months and Shanghai for three months so the thought of going back and getting to travel on my own through a new territory sounded amazing to me. For me, travelling is a way to pick up some pieces that may have gotten lost - a chance for me to find some inner meaning and understand what truly makes me happy away from home. The previous times I have gone to Asia I have stayed in model apartments and worked as a model so I was really looking forward to actually getting my hands dirty and truly exploring all the temples, street food, and sight seeing Asia has to offer.

Photo by Country Road

When creating my packing list for Southeast Asia the first thing I thought about was what bag do I want to bring? A carry-on? Legit backpack or suitcase? Well Asia is tough to travel around in a suitcase, especially in Vietnam where we will be spending most of our trip so I opted for my backpack I had used while backpacking in Europe. Selecting the right bag is essential to your packing list. Below is a quick prep list to keep in mind of things you will need and want while away!

Clothes:
  • 4 pairs of shorts. Two jean shorts that are different styles and one pair that is presentable for temples and dinners, as well as comfy shorts for bus rides or trains. 
  • Couple of t-shirts and two-three tops for dinner
  • One comfy day dress and two night time dresses
  • I didn't wear any skirts on my trip but always good to go out in
  • Don't forget when visiting temples you must show respect by wearing dresses that cover the knees and shoulders. Opt for a loose fit dress or harlem pants to keep cool.
  • Rain jacket
  • One light sweater for the plane & leggings
  • One pair of PJs
  • No need to bring pants in the middle of summer, trust me you won't wear them!
  • We plan to do some hikes and kayaking so bring two pieces of workout wear
  • Bathing suits & cover up
  • Three pairs of socks, undies, and bras. I literally just wore bralettes the whole time!

Shoes:
  • Flip Flops
  • Runners (old ones)
  • Dressy sandals
  • Heels (kitten heel if you are tall like me)

Accessories:
  • Hats (one baseball & one sun hat)
  • Sunglasses (2)
  • Jewelry (nothing fancy or heavy, keep it light and leave valuables at home)
  • Passport!
  • Money belt 
  • Going out purse & backpack
  • Travel wallet (I always switch to a different wallet, leave your giftcards at home)
  • Phone, SIM card, chargers
  • Plug adapters
  • Water bottle (S'well is a really good brand because it keeps your water cold which your body will need in the heat)
  • First aid kit - bandaids are a must!
  • Granola bars (for any planes, buses, etc)
  • Mosquito net (most hostels or hotels have these but I bring one to be safe)
  • Laundry detergent sheets (keeps clothes fresh and you can wash them with it as well)
  • Eye mask & ear plugs 
  • Locks for luggage
  • Kobo or one book

Toiletries:
  • Travel size shampoo, condition, and shower gel
  • Makeup
  • Lip balm with SPF
  • Sunscreen (high SPF please!)
  • Lotion and especially travel size Aloe, in case you get burnt
  • Throw away razors
  • Deodorant
  • Bug repellent (with DEET 30%) *Important to apply sunscreen wait for it to dry then bug repellent
  • Dry Shampoo (girls best friend)

Miscellaneous: 
  • VISA (if you need it to get into a country)
  • Scan two copies of passport
  • Vaccines
  • Contact your government to let them know where you are going: https://travel.gc.ca/travelling/registration
  • Let a family member or friend who isn't travelling know your details
  • Print out currency guide and language guide ahead of time. Or download apps that help you do this if you will have data. Google Translator and XE currency are great apps.
  • Bring any booking printed out as well just in case you don't have access to internet and something goes wrong with your booking... I like to be safe than sorry!

What are your travel must haves?! xo
SHARE:

Monday, May 9, 2016

How To Perfectly Layer Your Necklaces


I never take myself too seriously when it comes to jewelry, and neither should you! With fashion jewelry it’s fun to play around and create not only dynamic looks, but also versatile ways to update your wardrobe. Here I’ll show you 4 ways to easily create that effortlessly layered look, perfect for your individual style. You can also find this blog post on oliveandpiper.com, as well as Palm Breeze mobile app. 
Hint* when you see a Palm Breeze can shazam it so you can read blog posts by ME all summer long :) 

THE BASIC LAYERED LOOK

To create the basic layered look, simply stack on delicate necklaces that have different lengths to give your style more depth and purpose. Start with a simple and delicate pendant necklace, like this triangle trio – it’s a basic must-have and an everyday piece that goes with any outfit. Layer it with a longer lariat y-necklace to create length. The top piece should always be minimalistic and dainty, while the bottom piece gives more intrigue and sparkle. Together, they create an effortless layered look and fit so perfectly together. 
The Taylor necklace (shown) is a versatile 3-in-1 convertible necklace that combines the two strands together but can easily be separated so you can wear it solo or together. Both pieces are dainty and minimalist creating the perfect basic layered look. 

THE EDGY LAYERED LOOK
The Edgy layered look is another easy and versatile one to try! This style has a graduated effect, stacking on more than just two layers. Start with a classic dainty piece up top. The smaller the better, and with that you can add length to it. Add slightly longer and bigger necklaces below for contrast. This look is polished with enough layers for a fun everyday statement. Here we used our Mikhael Convertible necklace and Mirabella Pendant. We love the edgy pearls paired with the ultra-glam high-polished gold.
The Mikhael Necklace is also a versatile 3-in-1 convertible set that allows you to mix and match. Pair it with our Mirabella Pendant as your larger and longer statement piece.

THE POLISHED GLAM LAYERED LOOK
If edgy isn’t your thing and you are more of a classic, timeless girl, then this look will be your favourite! Bring in a fun statement piece and pair it with a dainty chain to get a polished yet glamorous look.
Start off with our favourite personalized necklace, the Signature Carrie Necklace – it’s an everyday piece we love wearing. When going out, we want to dress up and add a little sparkle, so pair your pendant necklace with a subtle statement like our Alessandra Necklace. While one is dainty, the other is bolder and more glam, balancing it out and creating a nice contrast. A personalized sentiment never goes out of style and the two are sophistication meets glamour - which we are totally okay with!
THE STATEMENT LAYERED LOOK

Last but not least one of our favourite ways to pump up for a girls night out is to over accessorize our jewels with a Statement Look.
Who said layering was only for pendant necklaces? Add contrast and go bold by playing with different lengths and silhouettes. Our Sunburst Deco Bib Necklace is the ultimate boho-luxe statement – it’s beautiful on its own, for sure! But, by adding our Luxe Crystal Collar and Lucy Crystal Collar we create texture and movement, building layers up towards the collar. All three necklaces make a mark by resting on top of each other. This look isn’t for everybody but those who are willing to be bold and have some fun - this won’t disappoint!
Find all these looks at oliveandpiper.com
SHARE:

Thursday, December 3, 2015

Chic Ways to Wrap Gifts This Holiday

The holiday season is fast approaching and presents are on my mind! Although I still have a lot more shopping to do, I really believe presentation is just as big as the gift itself. When someone adds a unique and special touch to the wrapping paper, it makes it 10x more exciting to open. Trust me!! Since there are so many creative and talented people out in this world I decided I would round up my top favourites. Easy DIY wrapping that everyone can do!

I also wanted to take into account how we can all reduce waste and find eco-friendly ways to wrap your presents this year without losing the beauty of it. Instead of buying new wrapping paper every year and sending it straight to the landfill, I've found very chic ways below to style your presents from finding paper around the house and other useful things. We all love to save money, don't we?!
Let me know which ones are your favourite. Take a look:
Fresh flowers and greenery is simple and chic.
Head over to your local dollar store and pick up some washi tape. Tons of great colour and shapes
that you cute and stick. So easy! Washi tape is also great to use to wrap the presents with instead
 of using boring scotch tape. 
Add some personal touch with monogram letters and fancy ribbon. Find a sentimental 
ornament at the dollar store, spray paint it gold and gift it as a token that can be reused every 
year and added to the tree. 
Printable gift wrapping paper from the Toffee Mag
Wrap some twine or wool around the present and cut out any shape. Add their name to 
the cut out as well for a personal touch. 
Love these patterns and tags to match! Printable wrapping paper and 
tags from The Lovely Drawer.

1 | 2 | 3 | 4 | 5 | 6

SHARE:

Thursday, October 8, 2015

Chic DIY Halloween Decor


As much as I love carving and roasting pumpkin seeds, this year I wanted to explore all the beautiful, chic pumpkins and go the unusual route of glamming it up. I came across a bejewelled pumpkin (below) and I fell in love with the look. I wanted to see how many more modern pumpkins I could find and be able to share with you easy ways to do so. I am all about a good DIY but to be honest I'm not into really hard or tricky ones. They have to be under 30 minutes or I just get bored so here are my all time favourite modern, chic halloween decor I discovered. 


From top to bottom: Cupcakes & Cashmere | Sugar & Cloth | Homey Oh My

Would love to hear your thoughts on easy DIY pumpkins and if you are into the chic look as well!!
xo

SHARE:

Friday, September 18, 2015

Beautiful Floral Cocktails


Well if your like me we all like our cocktails! But it can get really boring to order the same vodka soda each time. I got really inspired but all the beautiful garnished drinks I was seeing on my pinterest page so us girls at olive + piper decided to create an easy cocktail anyone can make. For more recipes here over there!


For this look above, just find your prettiest glasses and chop open a grapefruit (LOL) and you have achieved the "look". Next grab the ingredients, mix them together, and take some petals and leaves to garnish on top. This drink goes from being any old drink to a beautiful fab cocktail. 
Enjoy! x


"We Drank Olive it" Cocktail
Blood orange San Pellegrini
Fresh grapefruit or orange juice
White wine
Mint Leaves


SHARE:

Friday, August 21, 2015

DIY Cactus Planter

Time: 30 Minutes

I'm a big flower girl, I really believe that flowers in your house and garden really make your living space more enjoyable but lately I've been seeing more cacti/ succulent plants floating around home and living styling magazines. I never before saw them as a happy accessory to my desk but lately I've changed my mind. 
I was at Granville Island and noticed a bunch of succulents one morning. There were the plain plant ones and then there was these beautiful ones in a white planters. I decided I would my $20 (for delicious seafood and treats) and make my own pretty white potted plants. Below are simple steps if you want to make your plants have a prettier base and instagram worthy!
What you will need: 
planter, acrylic paint, paint brush, & cactus
First you will wipe down the pot to get rid of any existing residue. The acrylic paint is great for any service especially clay pots, I was really surprised by how easy it went on. Feel free to paint your pot any color and add fun designs along the way. I prefer the simple, all white look to mine but everyone is different! I would give the paint two coats and wait to dry. Once it's dry remove the plant and soil from the original package and put it in the pot. Make sure the soil has fertilizer in it and some water. 

How do you take care of your cactus? Here are some easy tips:
- Cacti/Succulents do not need a lot of water, spray them sparingly
- Need bright, not direct sunlight
- Fertilize every second month


SHARE:
© Emily Jane. All rights reserved.
Blogger templates by pipdig